Wednesday, August 15, 2018

SharePoint List Attachment Field Validation through Info Path

1.) Create a field in addition to the attachments field. In my case, I called the field I created Attachment Validation.
2.) Drop your field onto the form and remove the borders and background. Then set the default text to ‘Attachments:’
InfoPath 2010 Attachments Field Validation
3.) Finally, lets apply some validation to this field. Right click the field on your form and select Rules > Manage Rules.
In my case, I needed to make sure there was at least one attachement. So, I counted the :attachmentURL instances and checked if there were more than 0. To do this, I used a custom expression:
Now with all of that complete you will have a separate field that validates the attachments field and if there are no attachments, the text in the left hand column will be surrounded in the standard red dashed border.
InfoPath 2010 Validation on Attachments Field
NOTE:
To get to the ‘:attachmentsURL’ field you need to create the validation make sure you go into Advanced View of the fields.
InfoPath 2010 Attachments :attachmentURL field advanced view

Monday, August 13, 2018

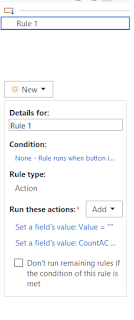
Make only any 3 check box clickable in multiple selection list box of SharePoint list field through Info Path.

  • First Create a field called "CountAC" and set fields value of count the clicked check boxes. Like:
  • now create a rule to validate at most 3 check box.


  •  Now add a clear button to set the fields value and CountAC value to null for editing purpose.


Wednesday, April 12, 2017

Removing Shorcut Virus using Command Prompt

Steps To Delete Shortcut Virus By Using CMD:

If you do not wish to install any other shortcut virus remover application , then you can simply remove shortcut virus from your PC/laptop or pendrive by using a command prompt (CMD). Even if you are a non-techy person then also you can easily remove shortcut virus from your pendrive or PC by following the CMD tutorial.
  1. Open command prompt (CMD). (Go to Run >> type CMD >> Hit enter )
  2. Type the drive letter of your removable device and a colon after it and hit enter. (Eg: g:)
  3. Now type: attrib g:*.* /d /s -h -r -s . (Replace g: with the drive name of your drive)
  4. Hit enter.

Wednesday, April 5, 2017

Adding New Custom Themes in SharePoint 2013

<SharePoint:CssRegistration ID="CssRegistration1" Name="Themable/corev15.css" runat="server" />
<SharePoint:CssRegistration ID="CssRegistration2" Name="/Style Library/css/customized.css" runat="server" After="corev15.css" />


SharePoint List Attachment Field Validation through Info Path

1.) Create a field in addition to the attachments field. In my case, I called the field I created Attachment Validation. 2.) Drop your f...